Saving Data On Twitch
So what can you do when it comes to saving data on Twitch?
For the most part, saving data on Twitch comes down to essentially changing the video quality settings each time you watch a video. Essentially the lower the quality of the video, the lower the data use and the higher the quality the higher the data use. To change video quality settings here’s what you need to do:
All images in this guide were taken on a PC using Google Chrome
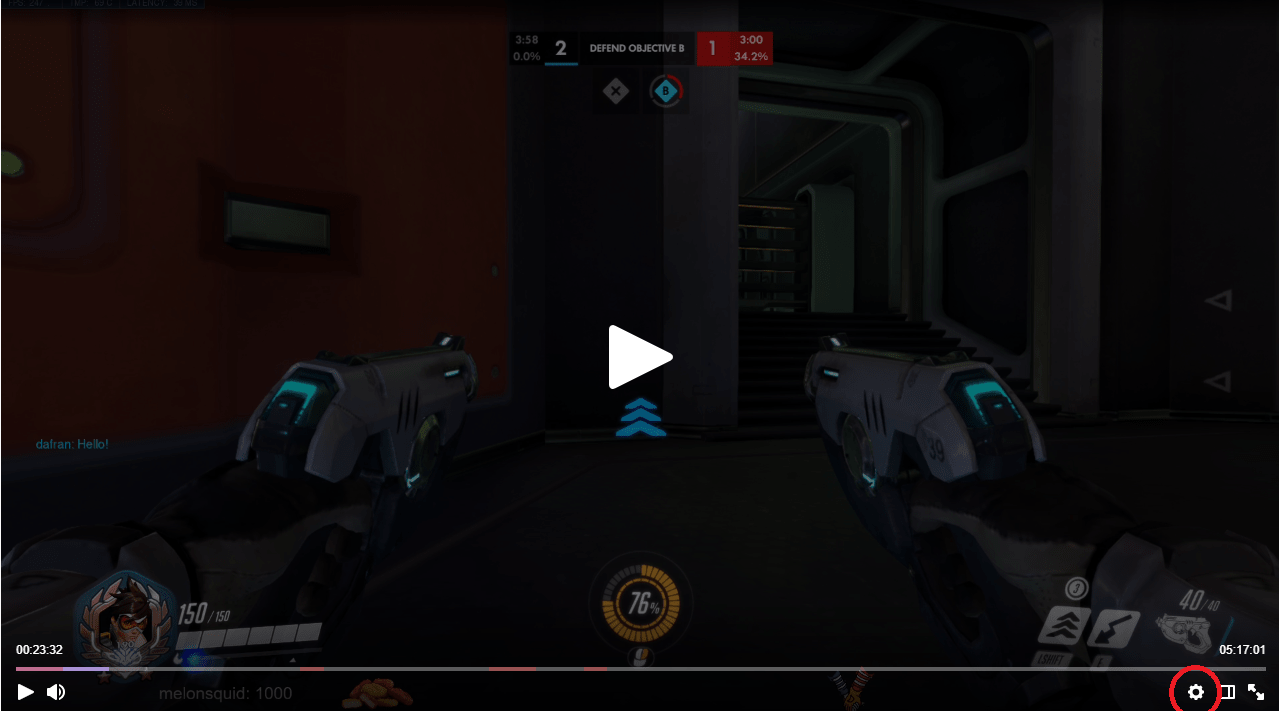
Step 1: Visit Twitch.tv and find a streamer you would like to watch. Click on their video.
Step 2: Look towards the bottom right of the video. You will see a gear icon. Click on that to open the settings of the video.
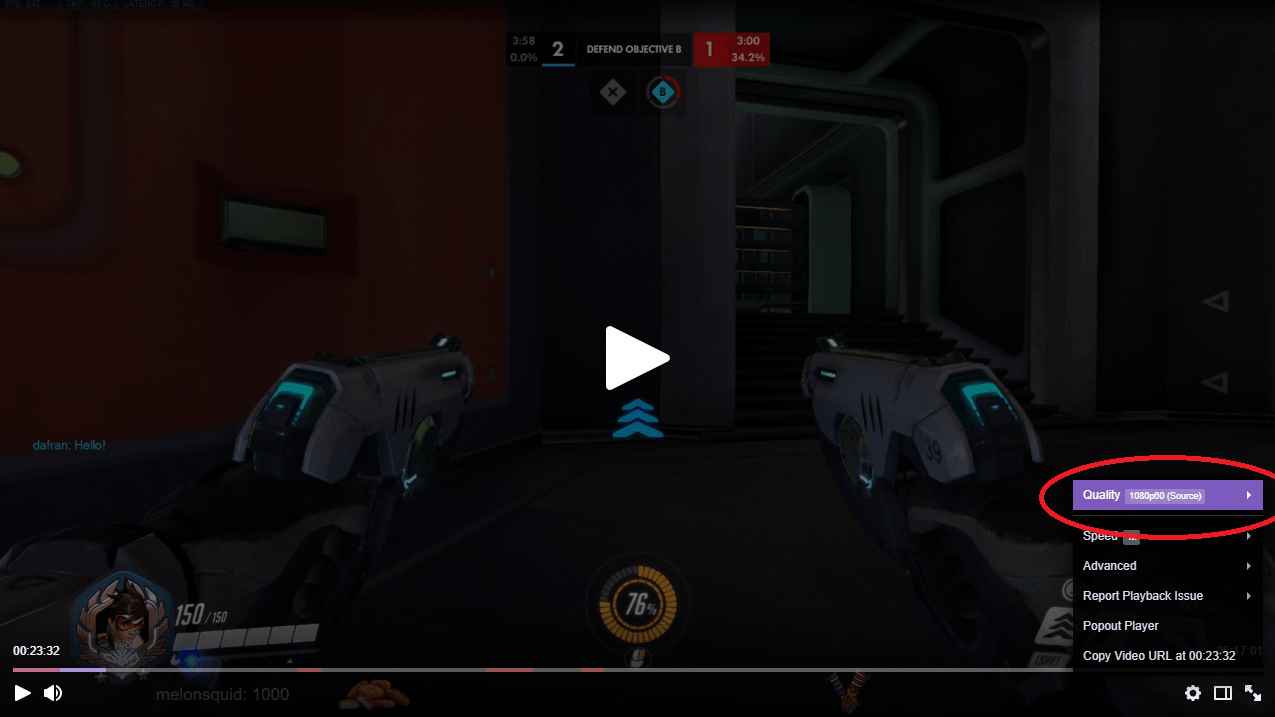
Step 3: With the settings now open, click on the menu item labelled “Quality”.
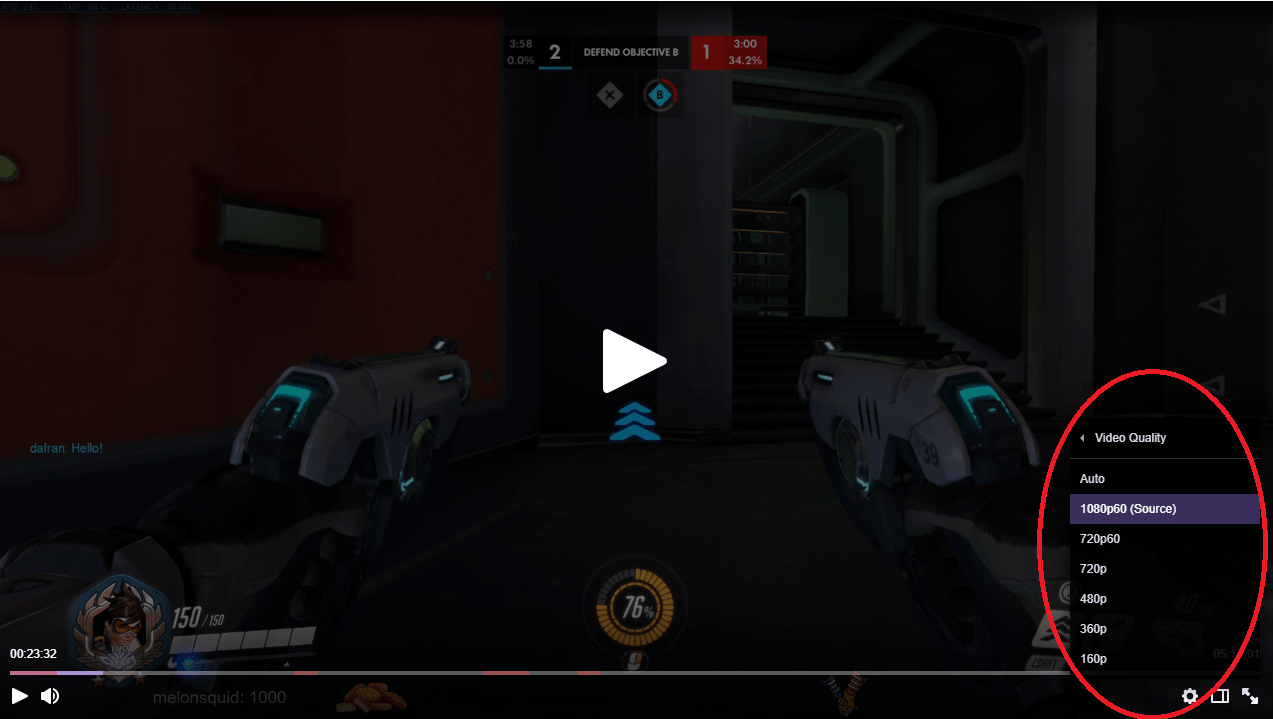
Step 4: Once you’re in the “Quality” section, you will now see a list of different video quality options for each stream. If you’re looking for a lower data setting, choose one of the lower video quality options.
But how do I know how much data each video quality setting is using?
Taking a look at how much data exactly each stream is using is actually not much more difficult than changing the video quality. What’s interesting to know from our findings on this is that the 60fps video options for both 1080p and 720p use quite a bit more data than the next lowest option of 720p. If you want to lower your Twitch data a little, but still want good watchable quality on bigger screens, it’s recommended to choose the 720p (not 720p 60) option.
Here’s how you know how much data each quality setting is using
Step 1: Visit Twitch.tv and find a streamer you would like to watch. Click on their video.
Step 2: Look towards the bottom right of the video. You will see a gear icon. Click on that to open the settings of the video.
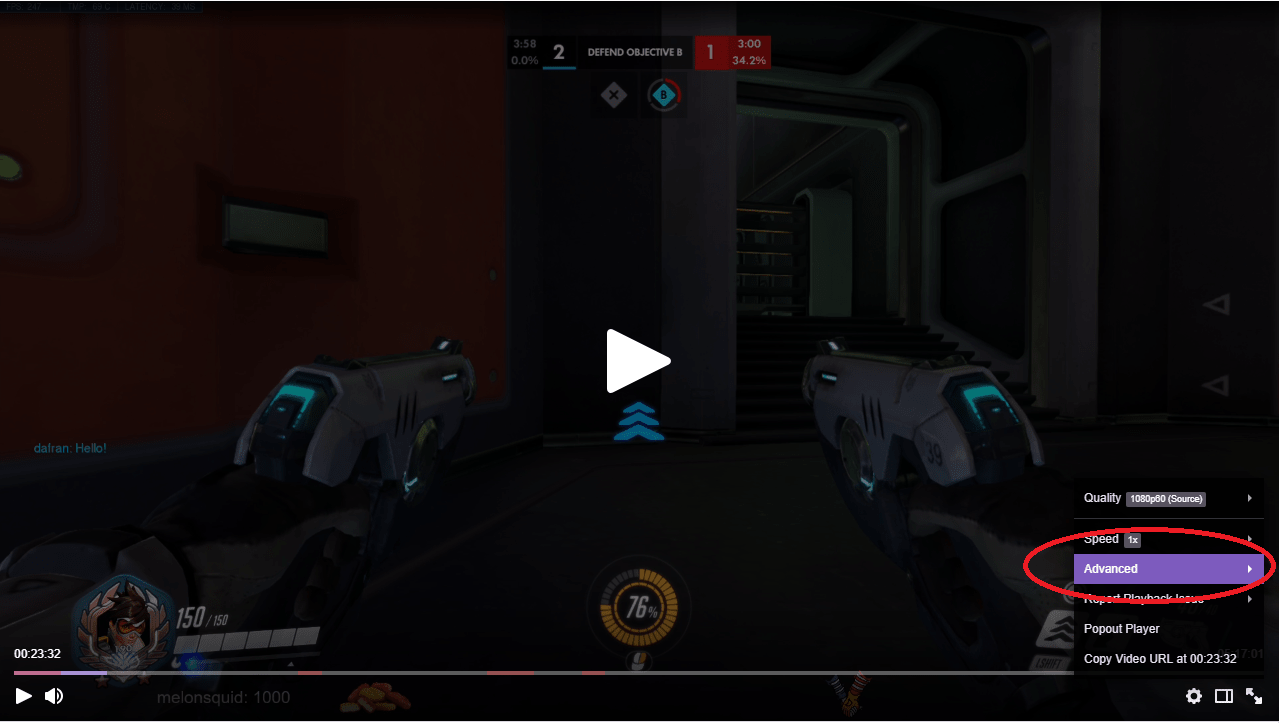
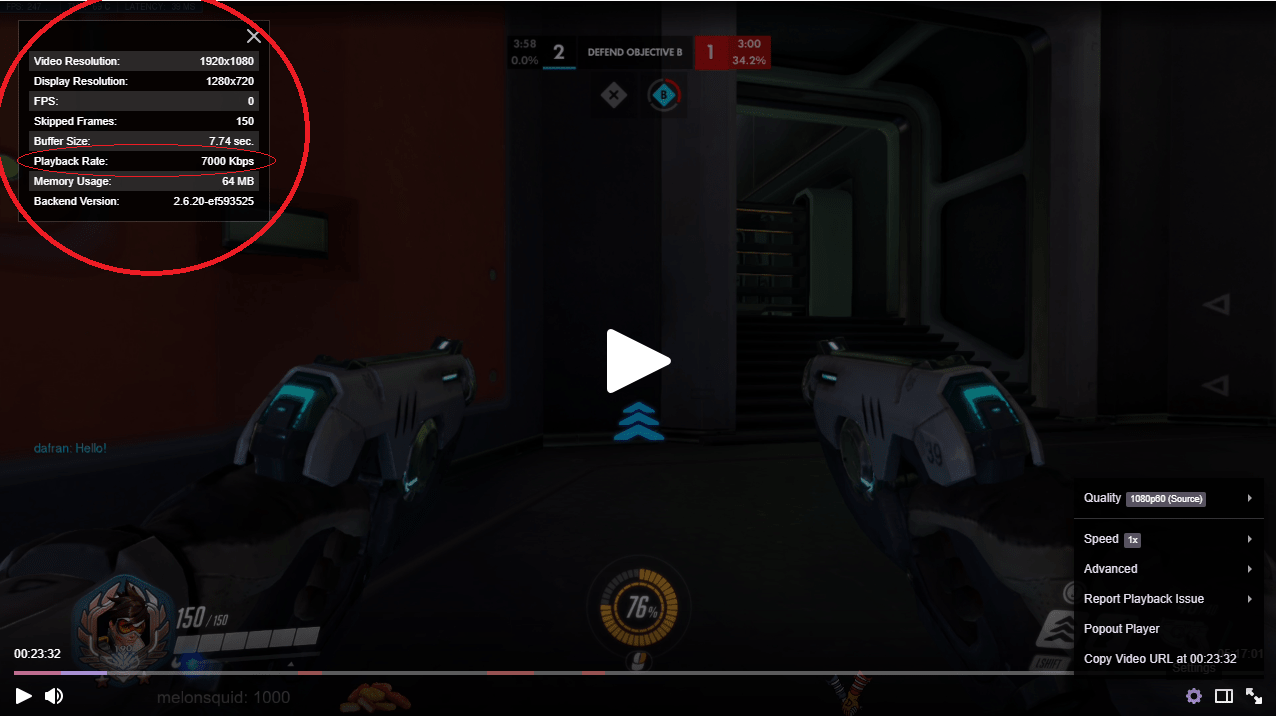
Step 3: Click on the menu item that says “Advanced”
Step 4: Now that you are in the advanced menu, click the option that reads “Show Video Stats”.
Step 5: Once you have opened the video stats, a small window will appear to the top left of your video with different pieces of information about what is happening. In this area, you can see how much data the stream you are currently watching is using.
In the below example you can see that at 1080p and 60fps, the stream was using 7000kbps which is high data usage.
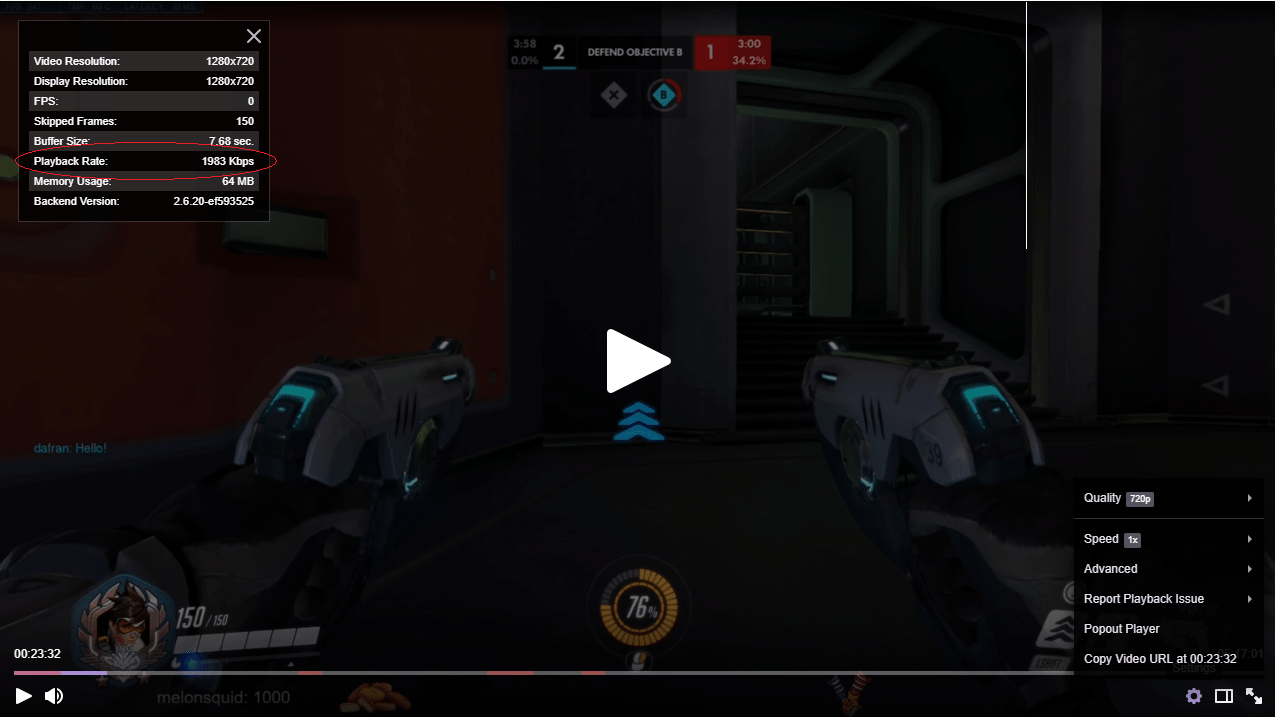
When compared to the lower quality video option of 720p. You can see in the image below that actually it is much less when it comes to data for the 720p option. At this video quality you can see that data consumed is only 1983kbps, much less than the top level 1080p 60fps option and a big saving on your plan’s data!
It’s a good idea to play with the video quality settings and choose the one that’s right for you at home and use the video stats feature to check how much data you are using in different streams.
When Streaming On Twitch
You may have kids at home who have decided to stream themselves playing video games on the site. The data from this works similarly to the data when watching a video stream. But the ability to stream will be based on the upload speed in your plan. As you are uploading videos to the internet.
The data you upload on an IPSTAR plan does count towards your download data limit, so it’s something to keep in mind when deciding to go live.
Twitch does have a very useful chart about how much data streaming videos live on the site consumes. You can find all the information about livestreaming and data on Twitch right here.
Generally the higher quality livestreams will use 4500-6000 kbps on 1080p 60fps settings and the lower quality stream qualities will use 400-1200 kbps at 480, 360 and 240 video quality options. These settings depend on your PC settings for the stream, what streaming software you are using, what you’ve chosen to output and also what your plan’s upload speed limit can handle.
Related Articles
Saving Data With Facebook Video
In recent years, Facebook has become the centre of many of our lives. We use it for sharing our daily activities, checking on our friends and even sending private messages to one another. Over the years, Facebook has changed quite a bit. Facebook no ...Saving Data For PC Gamers
These handy tips will give you clues for what to look for when saving data on some of the most popular gaming applications that PC gamers might use these school holidays. Battle.net The Battle.net app is a popular game launcher for PC gamers who play ...How To Reduce Stan Data Usage
If you’ve been watching a lot of Stan lately, then you may have noticed your data usage sky rocketing after each session. With so many shows releasing on Stan each week, it’s hard to resist watching them whilst simultaneously staying under your data ...Tips For Reducing Data For Apple TV Users
If you are an Apple enthusiast, being part of the Apple ecosystem can be very convenient. You can have your iPhone, iPad, Mac and now even your TV all synced together. Apple TV is a great asset to have in your home because it will give you access to ...Turning Off Automatic Downloads On IOS Devices To Save Data
IOS devices are great to have and if you have many of them, they can be linked together and all the content on each device can be downloaded automatically on all other IOS devices. If you’ve subscribed to content like a podcast series or TV show, new ...